Hystrix Fallbacks – Protect yourself and wrap them in a lambda

When building microservices, it’s always a good idea to build in some capability to circuit break on your downstream dependencies whenever they are experiencing issues, or perhaps networking problems that cause delayed response times.

One utility that is fairly common is Hystrix, built by Netflix. This post is not going to detail how to use it, nor how to configure it. However, recently we’ve found what seemed like some interesting behaviour where our http requests were taking longer than we expected for calls that were failing on our downstreams.

This post is an attempt to explain how you should write your HystrixCommands, and in particular, your fallback methods, and why you should care.

TL;DR

When creating HystrixCommands, wrapping your fallbacks in another HystrixCommand isn’t a silver bullet.

Example code can be found on GitHub.

If you’re running IntelliJ IDEA, I’d recommend the GrepConsole plugin if you haven’t already installed it. It’ll make correlating the log output and the diagram a little easier. Further details are in the README.

Setting the scene:

We noticed unexpectedly longer response times from our microservice whenever our downstreams were failing due to slow network traffic. In the case of any failures, we’d written our HystrixCommand’s to look up a previously stored backups from the database. Upon inspection, we found that the fallback method in our HystrixCommand’s were just making direct database calls via our DAO (and subsequently through the driver). And as it turns out, doing so presents two major problems:

1. Indeterministic execution time in the fallback

Once the fallback method is executed, it will not be managed by a timer (however it could very well execute on a timer thread), and subsequently it can affect the response times for the initiating caller. i.e. fallbacks are not bound to be interrupted like in the run() method. Wrapping the fallback call in a HystrixCommand seemed for us, like the right thing to do, but from our testing, this isn’t necessarily the case. More on this later…

2. Slower and slower calls when timing out.

When the fallback is executed because of a timeout, the fallback will be executed on a HystrixTimer thread. A little gotcha is that there are only as many HystrixTimer threads as there are CPU cores. So on a CPU with 4 cores, you’ll only have 4 HystrixTimer threads to execute fallbacks in the event of timeouts. I stress the timeouts because in other circumstances, the fallback will either execute on the initiating thread, or on the Hystrix worker thread, which both have a configurable thread pool – but your timer threads are not! So, if your timer thread is responsible for executing your fallback, and it becomes held up with lengthy executions, then it’s unable to service any other timeouts. This is of course will only really become apparent when you have many concurrent requests, with many downstream failures. You might be thinking this isn’t a great problem, because surely the circuit breaker will kick in and then all fallbacks will execute on the initiating thread, so its only an edge case? You’d be correct, but think about the fact where you might have many downstreams, all of which are timing out because of slow network issues, then this problem becomes compounded until your circuit breakers are enforced!

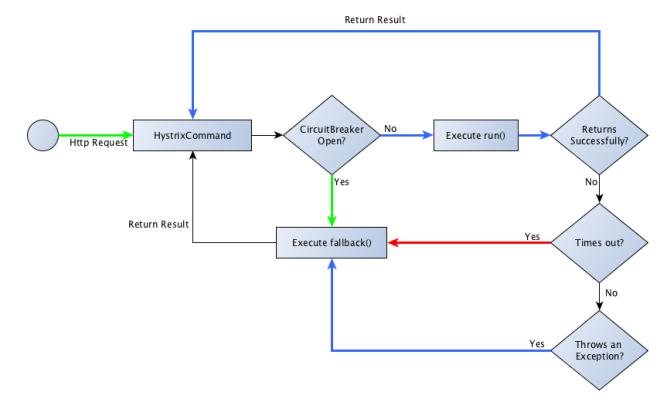
Below is my attempt at trying to articulate the threads that your command is executed on in particular circumstances.

Green = Initiating thread
Red = HystrixTimer thread
Blue = Hystrix worker thread

hystrix-thread-execution

Now I’d like to revisit the comment I made earlier about our assumption that wrapping the fallback into a HystrixCommand call would solve our problems. Unfortunately, it doesn’t really. In fact, I think judging by the sample tests, it probably makes things a little worse! As you’ll see, there are many cases where the result returned to the client was:

Should have timed out by this point!

The reason we get this as the return result is because the HystrixTimer thread never got around to interrupting the running execution because it was held up by other tasks.

The conclusion

I think by now, it’s become pretty clear that when your fallback executes, it should do so as quickly as possible – so that it can release the HystrixTimer thread to do its stuff. One pitfall is to assume that wrapping the fallback in a HystrixCommand would save the day, but in reality, it actually uses up two timer threads which will block until the call stack unrolls.

There is however another interesting alternative to avoid the HystrixTimer thread from being blocked. This is where Lambdas come to the rescue – well, partially at least. If you look at the SlowRunAndFallbackExecutedOnCallingThreadCommand you’ll notice that instead of it returning the standard String type like the other commands, it’s instead returning a Result<String> which is how we’re going to leverage the deferred fallback behaviour. By returning a Result<T> object we’re standardising the response we get whether it was from the  run() or the fallback() method. In the fallback, we create a DeferredResult<String> (a specialisation on Result<T>) object which is created with a Java 8 Supplier  lambda, and this Supplier forms the unit of work which needs to complete, and will only be invoked when the result is actually needed, which in this example, is when we’re back on the initiating thread, and out of the Hystrix “world” of threads.

The downside of course is that if your fallback is a long blocking call, there is no alternative way for you to deterministically time it out other than doing that yourself inside either the DeferredResult object, or wrapping the DeferredResult<String>.get() method  yourself in something like a Future which could then be timed out. Both of which aren’t the most elegant IMHO. So this isn’t the silver bullet to the problem, but it certainly avoids the tying up of the HystrixTimer threads, and bring the control back onto your initiating thread.

Don’t fall into the trap of thinking you can do something like xxx.queue().get(1, TimeUnit.SECONDS), for example, as all that will do is duplicate the work that the HystrixTimer thread is effectively going to do anyway, the only difference is that you’re being more specific, and it still will have no effect on the time taken in the fallback!

I certainly cannot take the credit for this approach. In fact, this solution had never really occurred to me until it was mentioned to me by a rather smart Paul McGuire. I think this is a pretty neat solution – but go check it out for yourself!

Hopefully this has gone a little way to shedding some light on how Hystrix chooses to execute commands on what threads, as I couldn’t find any mention of this sort of behaviour in the docs. I’ll certainly be more thoughtful of the next HystrixCommands I write to take this sort of behaviour into account.

Spring 3.1 RESTful Authentication

Lately I’ve been dabbling in trying to secure a REST service that I’ve built using Spring & Spring Security. I’ve been reading quite a bit about REST of late(and have been for quite some time), and the popular themes around security I’m noticing, is that HTTPS is a good thing, and persisting any sort of session state(even user authentication) is not the best practise. So I decided to take a look at what Spring have provided in the way of authentiction when using web apps, and decided that there wasn’t anything pre-configured that I could use that would require me to provide my security credentials on every request, and effectively re-authenticate, unless of course you were going to use Basic Authentication, or Digest authentication.

Looking around at how others in the industry implement security for their REST services, I came across a pretty neat implementation at Kayako, and thought I’d adopt the same principle. If you’ve not seen how Kayako secure their REST services, its quite simple. You, as a client, need to provide 3 things.

1. The API Key

Something that identifies you as a user. Preferably this should be some “Not so easily guessable” string. I would suggest perhaps some guid. Add this as an additional attribute against the user details you hold in your DB. Allow the user to request a new guid through your web app if they feel that their current one has been compromised.

2. A Salt

This should be a random string that should change on every request. You could calculate and MD5 hash of the content of your request, or you could send any other random string.

3. Signature

This is the Hash(preferably a HMAC SHA, see my previous post about hashing passwords in Spring). This hash is a combination of your password, with the Salt mentioned above. On the server side, it’ll lookup your user details via your API Key, and validate the authenticity of your credentials by performing the same hash against your salt/password in the hope that it’ll arrive at the same signature that you’ve provided in the request. Obviously the password that is stored in the database would be a hashed password anyway, just so that it’s not obviously “guessable”.

I couldn’t find anything in Spring which is provided out of the box support for stateless authentication for REST, where I could provide these credentials in the URL, so I decided it would be fun to try and roll my own, using Kayako as a source of authority on how to provide the details for the secured REST call. Feel free to check out the sample app I’ve put together over on Github.

Whats Involved

In order to embark on creating your own mechanism for authentication with Spring, you need to be familiar with how the Spring Security model works. If you’re not familiar with it, I’d suggest a quick read over their documentation.

The main java classes involved in order to make this happen are the following:

1. The Filter (RESTAuthenticationFilter)

I’ve chosen to insert this filter where Spring would have used a Forms Authentication Filter. Below is a snippet where I’ve pointed out where/how I did this.


<sec:http disable-url-rewriting="true" entry-point-ref="forbiddenEntryPoint" use-expressions="true" create-session="never">
 <sec:anonymous enabled="false"/>
 <sec:session-management session-fixation-protection="none"/>
 <sec:custom-filter ref="restAuthenticationFilter" position="FORM_LOGIN_FILTER"/>
 <sec:intercept-url pattern="/**" access="isFullyAuthenticated()"/>
 </sec:http>

Notice how I’ve chosen specifically to not create a session, disabled anonymous access, and replaced the Forms Login Filter with my own.

2. The Authentication Provider (RESTDaoAuthenticationProvider)

This is essentially responsible for looking up the user, and validating their credentials. I’ve tried to use as much of already existing functionliaty so I’ve extended from the AbstractUserDetailsAuthenticationProvider, and the most important method here is the additionalAuthenticationChecks(...). This method is actually where the check is done to see if the password the user has supplied is in fact correct.

So thats the guts of it! There are obviously a few other supporting classes, but if you can get your head around this, then you’re well on your way to customising your authentication for REST Services in Spring.

The remote end hung up unexpectedly – Git + IntelliJ + Mac OS X

So I thought I’d try out IntelliJ’s neat little feature to import my project into a Github repo. Now I always used to do the git repo setup manually at the command line, and then commit and push my changes from the terminal too! But to speed things up, I thought I’d give this a bash. Only to be prompted with the following error in the Version Control pane in IntelliJ:

java.io.IOException: There was a problem while connecting to github.com:22
at com.trilead.ssh2.Connection.connect(Connection.java:791)
at com.trilead.ssh2.Connection.connect(Connection.java:577)
at org.jetbrains.git4idea.ssh.SSHMain.start(SSHMain.java:154)
at org.jetbrains.git4idea.ssh.SSHMain.main(SSHMain.java:135)
Caused by: java.net.ConnectException: Connection refused
at java.net.PlainSocketImpl.socketConnect(Native Method)
at java.net.PlainSocketImpl.doConnect(PlainSocketImpl.java:351)
at java.net.PlainSocketImpl.connectToAddress(PlainSocketImpl.java:213)
at java.net.PlainSocketImpl.connect(PlainSocketImpl.java:200)
at java.net.SocksSocketImpl.connect(SocksSocketImpl.java:432)
at java.net.Socket.connect(Socket.java:529)
at com.trilead.ssh2.transport.TransportManager.establishConnection(TransportManager.java:341)
at com.trilead.ssh2.transport.TransportManager.initialize(TransportManager.java:449)
at com.trilead.ssh2.Connection.connect(Connection.java:731)
… 3 more
fatal: The remote end hung up unexpectedly

With a bit of searching and digging around on the net, I came across fatal: The remote end hung up unexpectedly and the obvious setup instructions on github. But the real gem that helped me out was Github (SSH) via public WIFI, port 22 blocked

I wouldn;t have originally thought that it would be because of the network I was connected to, but in desperation I resorted to looking around about ssh’ing on public networks, and eventually found this. For those who don’t feel like reading the StackOverflow question/answer, you basically just need to do the following:

Create the config

sudo nano ~/.ssh/config

Add the config

Host github.com
User YourEmail
Port 443
Hostname ssh.github.com

And Presto! When you push your changes from IntelliJ to Github, it’ll ask you if you trust this domain, and once you accept, all will be good with the world!

Overriding Spring Beans in a Servlet Context

A neat little trick I’ve recently picked up is the ability to override spring bean definitions in a web application, but inside the servlet context. I was always under the impression that only one spring application context was loaded for the entire web application, but in fact it appears that its actually loaded for each DispatcherServlet you have registered in your web.xml. I know, a slight oversight on my part. To be fair, most web apps I’ve worked with have only had one DispatcherServlet declared, so perhaps I can be forgiven for my short sighted ignorance 🙂

I’m definitely no Michealangelo when it comes to anything graphic, but here is a quick diagram illustrating what I’m going on about.

Illustration of how to override a spring bean definition to provide a custom bean for that Dispatcher Servlet application context.

The crux of this example lies in the web.xml.


<web-app xmlns="http://java.sun.com/xml/ns/javaee" xmlns:xsi="http://www.w3.org/2001/XMLSchema-instance"
xsi:schemaLocation="http://java.sun.com/xml/ns/javaee http://java.sun.com/xml/ns/javaee/web-app_2_5.xsd" version="2.5">

<context-param>
<param-name>contextConfigLocation</param-name>
<param-value>classpath:/default-spring-context.xml</param-value>
</context-param>

<listener>
<listener-class>org.springframework.web.context.ContextLoaderListener</listener-class>
</listener>

<servlet>
<servlet-name>spring-mvc-default</servlet-name>
<servlet-class>org.springframework.web.servlet.DispatcherServlet</servlet-class>
<init-param>
<param-name>contextConfigLocation</param-name>
<param-value></param-value>
</init-param>
<load-on-startup>1</load-on-startup>
</servlet>

<servlet-mapping>
<servlet-name>spring-mvc-default</servlet-name>
<url-pattern>/default/*</url-pattern>
</servlet-mapping>

<servlet>
<servlet-name>spring-mvc-custom</servlet-name>
<servlet-class>org.springframework.web.servlet.DispatcherServlet</servlet-class>
<init-param>
<param-name>contextConfigLocation</param-name>
<param-value>classpath:/default-spring-context.xml,classpath:/dispatcher-context.xml</param-value>
</init-param>
<load-on-startup>2</load-on-startup>
</servlet>

<servlet-mapping>
<servlet-name>spring-mvc-custom</servlet-name>
<url-pattern>/custom/*</url-pattern>
</servlet-mapping>

</web-app>

Notice how the spring-mvc-default has its contextConfigLocation init-param value set to nothing, leaving it up to the ContextLoaderListener to load it from the declared ContextParam declared in the beginning, and also how the spring-mvc-custom has it’s contextConfigLocation init-param value of set to the default and the dispatcher specific config file.

I’ve found this quite useful in some of the web apps I’ve been building where I need a specific type of bean to be injected instead of the default one declared. Something to also note here is that in each ServletContext(i.e. each DispatcherServlet definition), they cannot see the customised beans that are being used by any of the others. Each DispatcherServlet loads its own isolated Application Context.

Update: If you’d like top see this in action, albeit a very contrived example then head over to github here,

REST vs SOAP services – How I made my choice.

During a recent bout of product development, we were faced with a task of how to get massive amounts of financial data into our database. Bearing in mind, that our product is driven by client data which is pumped into it, we needed to find a way to expose a public facade, to authorised users only, in order for them to pump this data through. Oh, and our clients could prefer using other technologies for sending this data. i.e. .NET,Java, Ruby etc.

After much investigation I settled implement REST services through Spring. These were my top 3 reasons, of course I had a lot more, but these really stood out for me.

1. Low entry point and lightweight.

How many times have you heard this? But it’s true! Its just the HTTP stack you need. I unfortunately am constrained with time(aren’t we all?!) and I don’t really want the hassle of having to deal with massive unreadable SOAP packets, not to mention the toolkits I’ll need along with over-bloated configuration that goes along with it! I might be unfairly judging SOAP web services here, but I’ve never really had a pleasurable experience implementing SOAP in the past, especially when I have to keep in mind that the clients we’re relying on to use this platform could be clients who employ software developers of  varying degrees, so most of all I want to keep interfacing with our system as easy as possible.

2. Convention over configuration.

When developing REST like services, you have to adhere to simple URL’s otherwise no one is going to want to use it, and it makes things much simpler. I for one really don’t want to have to remember a massive URL just to add one record to a customer’s details. Adopting this approach really forces you to take a step back and think about how you represent your data, and how you plan to manipulate it. Doing that I’ve found has actually provided a better view of how our domain entities relate to each other, and their dependencies become transparent.

3. Authentication and Authorisation

I know many would argue that SOAP WS-Security is probably the most secure way to go, but to be completely honest, all my communication is going to take place over https and https only. What more do I need?  Implementing Authentication and authorisation over REST is just as secure, provided you make sure you don’t cut any corners, and not only that, it’s also simple if all you’re going to be doing is relying on already existing web authentication mechanisms. i.e. BASIC, FORM etc… I however have decided to implement my own authentication mechanism in Spring. Watch out for it in my next blog post.

4. Discoverability

OK, I know, I said top 3, but I couldn’t resist not mentioning this one. And its about being able to easily include self discovery of services while using REST services. And I must admit, this also played a big role in me making the decision to use REST for the kind of services we provide. REST in Practice really goes a long way in advocating explorable services through hypermedia, and I would urge anyone who is considering REST to give it a read. And if you find yourself racing through that book, then get yourself the REST API Design Rulebook which will help guide you in making the right choices when build your REST service.

Next up, how to authenticate the user in a REST kinda way….

JSR303 + Spring MVC + Selective Validations

If you’ve ever been using the JSR 303 bean validation in Spring MVC, using the @Valid annotation inside your controllers, you’ve no doubt been frustrated somewhat by the lack of support for selective bean validation. What I mean by this is that in some cases(in reality most cases!) when you validate a bean, you want control over what gets validated and when.

In the past, one of the ways to overcome the @Valid running all of your validations was to either use different model objects or to whip up your own custom version of the @Valid annotation, which isn’t the cleanest way to go about it if you ask me. It’s just to open to errors.

Well thankfully, with Spring 3.1, there is now the introduction of the @Validated annotation which you can use in place of @Valid. We now have the opportunity to specify “groups” to validate. So typically, when you’re applying the bean validation to your model object, it would usually look something like this:

public class UserDTO {

@NotBlank(message = "Username must be supplied.", groups = {Default.class, MinimalUserValidation.class})
@Length(min = 6, message = "Username must be at least 6 characters long.")
private String username;

@NotBlank(message = "Password must be supplied.", groups = {Default.class, MinimalUserValidation.class})
private String password;
private String confirmPassword;

//Rest of class definition ommitted for brevity
}

Notice how on line 3 & 7, we have now specified the groups value, and have provided it with marker interfaces, declaring that these are the validations we’d like to have run when any one of these marker interfaces are mentioned within our @Validated annotation.

So, if we only wanted to run the MinmalUserValidation marked validations, then this is what your controller method would look like:


@RequestMapping(value="/add-user-partial.html", method = RequestMethod.POST)
public String createNewUserWithPartialValidation(@Validated(value = MinimalUserValidation.class) UserDTO userDTO, BindingResult bindingResult, Model model){
// Method body omitted for brevity
}

And thats all there is to it. I have a sample project on Github here if you want to check it out.

As a side note – For the curious amongst us, you’ll soon notice after digging around a bit on the constraint annotation interface (check out the javax.validation.constraints.AssertTrue for an example), you’ll see it includes a <code>payload</code> attribute. After a bit of google goodness, I came across this blog post which provided the answers I was looking for. 🙂

Android Development Part 2 – RoboGuice & Robolectric

Wow, this really is a belated post! I apologise for taking nearly 6 months to write this, but things have gotten me rather distracted over the past couple of months which hopefully I’ll share in the next few blog posts to come (I promise I won’t take another 6 more months to write those either! 🙂 )

So, as promised in my previous post, I said I’d talk about some frameworks to get you up and running quickly with building android applications. In fact there are 2 which I found invaluable. RoboGuice, and Robolectric.

RoboGuice

If you’re familiar with dependency injection and your normal run of the mill IoC frameworks, then RoboGuice will make you feel right at home! I’d already had quite a bit of experience with Spring, so using RoboGuice was relatively straight forward. They have a very good “Getting Started” guide on their site,  which I encourage you to read if you need a little nudge in the right direction. What sealed it for me was that RoboGuice could take care of the boring stuff for me, like injecting my Views, Resources and Services which I would have normally had to painstakingly code the lookups for myself. You’ll find that without RoboGuice, you’ll be coding a lot of lines that look like this (Unashamedly plagiarized from RoboGuice’s getting started page!):

class AndroidWay extends Activity {
    TextView name;
    ImageView thumbnail;
    LocationManager loc;
    Drawable icon;
    String myName;

    public void onCreate(Bundle savedInstanceState) {
        super.onCreate(savedInstanceState);
        setContentView(R.layout.main);
        name      = (TextView) findViewById(R.id.name);
        thumbnail = (ImageView) findViewById(R.id.thumbnail);
        loc       = (LocationManager) getSystemService(Activity.LOCATION_SERVICE);
        icon      = getResources().getDrawable(R.drawable.icon);
        myName    = getString(R.string.app_name);
        name.setText( "Hello, " + myName );
    }
}

So as you can see, there is a fair amount of plumbing going on here, and this is just a simple view. Imagine a form input view which has a myriad of input and label fields, from drop downs, to TextViews, to Lists etc. Man I’m getting a headache just thinking how messy it could get! 🙂 So, lets face it, who really wants to have to type that line to find the view, and remember to cast it correctly,  or do that laborious resource lookup – quite frankly, its a waste of time!

So by simply using the @InjectView, @InjectResource or just plain @Inject, you can avoid all this pain quite easily, and here is a sample of the above example using RoboGuice (Unashamedly plagiarized from RoboGuice’s getting started page!):

class RoboWay extends RoboActivity {
    @InjectView(R.id.name)             TextView name;
    @InjectView(R.id.thumbnail)        ImageView thumbnail;(Unashamedly plagiarized from Roboguice's getting started page!)
    @InjectResource(R.drawable.icon)   Drawable icon;
    @InjectResource(R.string.app_name) String myName;
    @Inject                            LocationManager loc;

    public void onCreate(Bundle savedInstanceState) {
        super.onCreate(savedInstanceState);
        setContentView(R.layout.main);
        name.setText( "Hello, " + myName );
    }
}

Robolectric

Now with RoboGuice and all its injectable goodness, you wouldn’t be accused of wondering if this makes your testing easier… well let me put your mind at rest and tell you, that YES, it most certainly does! And what better way to test your functionality, than with an android testing framework known as Robolectric. I’ve seen in the past, quite a few approaches to testing android apps, and some of them involved actually booting up an emulator, deploying the package, and running the app with the tests. This is a very time-consuming operation, and to be honest, most of the time, we just want to test the functionality that we have written, which can’t be done without the inclusion of the activities and views along with their respective interactions. How does Robolectric achieve this? Well, to quote from their website:

Robolectric makes this possible by intercepting the loading of the Android classes and rewriting the method bodies. Robolectric re-defines Android methods so they return null (or 0, false, etc.), or if provided Robolectric will forward method calls to shadow Android objects giving the Android SDK behavior. Robolectric provides a large number of shadow objects covering much of what a typical application would need to test-drive the business logic and functionality of your application. Coverage of the SDK is improving every day.

So, what this essentially boils down to is that, Robolectric has its own Test runner(which you use with the @RunWith annotation), which will mimic your android device, by returning what effectively is a mock object for things like location services, or views, or resources etc. You can then even override these mock objects – also referred to “shadow objects” – which you can code yourself to return a predicted outcome. This allows you to test your android app from within a JVM, even inside your own IDE! No need for bootstrapping an emulator, no need for compiling and packaging it into a dex and deploying. Just write the test, and run. The beauty of this, at least for me, is that I can now run these tests via maven, and include them as part of my CI build. Job Done. You might not be able to catch form factor bugs in this manner, but I believe that trying to test for different form factors on different devices provided by different vendors actually requires a different approach which I haven’t yet had to tackle – but when I do, my solution will be up here. 🙂

Well that’s all for now. I hope this helps any of you out there thinking of writing an android app, and need help getting started. If you can get your project structure right, and use these two frameworks I’ve mentioned, you’ll be well on your well to a painless and happily filled developement life! 🙂

Android Development Part 1 – Choosing the right project structure

I’ve been doing some android development now for a little over 4 months, and I thought I’d try to convey my lessons learnt while both celebrating my successes, and bashing my head on my not so grandest moments. I’ll attempt to break my journey into a few blog posts which will talk about project setup, all they way through to choosing the right frameowkrs, and deployment of the app.

So to start, lets talk about how to structure your project. I’ve used eclipse to develop my android goodness, and I’ve found it to suffice for what I need – although I am pretty tempted these days to IntelliJ, but thats a story for another blog post! 🙂

The best way I found to structure my project, was to use maven. Honestly, I could have just stuck with the standard project that comes with the android SDK, but there’s something that really erks me about not describing my dependiencies in a POM file! This also makes me feel a little more cosier inside for when I eventually try and set the beast up to run a Jenkins build!

OK, so we’ve established that we need to use Maven. Thats great, but how do I go about trying to structure where my files go, and what about the nice feature in eclipse that allows me to build my android project, and even deploy it?! Well, here comes the neat little plugin called : maven-android-plugin This is a fantastic little maven plugin to help you build you project, and to help you along, below is a xml snippet of what it would look like configured in your pom:

<dependencies>
	<dependency>
		<groupId>com.google.android</groupId>
		<artifactId>android</artifactId>
		<version>2.2.1</version>
		<scope>provided</scope>
	</dependency>
</dependencies>
<!-- Other config ommited for brevity -->
<build>
<plugins>
	<plugin>
		<groupId>com.jayway.maven.plugins.android.generation2</groupId>
		<artifactId>maven-android-plugin</artifactId>
		<version>2.9.0-SNAPSHOT</version> <!-- 2.8.4 -->
		<configuration>
			<sdk>
				<path>${env.ANDROID_HOME}</path>
				<!-- platform or api level (api level 4 = platform 1.6)-->
				<platform>8</platform>
			</sdk>
			<device><!-- Insert the device ID here if you want to deploy to an actual device --></device>
			<!--  emulator>emulator_name</emulator -->
			<deleteConflictingFiles>true</deleteConflictingFiles>
			<undeployBeforeDeploy>true</undeployBeforeDeploy>
			<coreLibrary>true</coreLibrary>
		</configuration>
		<extensions>true</extensions>
	</plugin>
</plugins>
</build>

One thing worth mentioning here, is the version of the maven-android-plugin I’m using. Its actually my own rolled version which I forked from the github repo because I needed to fix a bug. The bug fix has been included into the currently 3.0.0-alpha-1 release. You can read about it here. I haven’t yet updated to the 3.0.0-alpha-1 version, because I haven’t had time yet to make sure everything still works. I can’t see anything majorly wrong with using this version for now, but do be warned.. it is an alpha after all!

With that started, I’ll be writing next about some really cool frameworks there are for the android platform, that could easily cut down on the amount of code you’d have to write!

Till next time…

Belated SpringSource S2G Forum Notes

I’ve been rather ill recently, and so this post is a bit belated, but still worth mentioning I think – if for anything else, just to refresh my memory 😉

I recently attended the SpringSource S2G Forum Series at the London Hilton. There were some good sessions being presented, and sometimes I wish I could clone myself, as more often than not, there’s always more than one really good session running in the same time slot!

My three big take-aways were Tomcat 7, Spring MVC 3.1 update and the Spring Data Project, which I’ll talk about here.

Tomcat 7

So, first up, after the keynote, was a brush over what’s new in Tomcat 7. I must say, there are some rather neat enhancements in v7 that I’ll be looking forward to(but not necessarily using):

  • Support for parallel deployment
    • This is fantastic IMO. This enables you to deploy multiple different versions on the same web application (WAR) concurrently, all being accessed by the same context path. Tomcat will automatically route new sessions to the latest version of the application, while current sessions on older versions will continue their requests to those versions until their session expires. This greatly reduces deployment costs, and having to worry about deployment upgrade schedules/windows. Upgrading using parallel deployments will make upgrading seamless.
  • The ability to configure an active tomcat instance via JMX from just running the server component.
    • I think this is great news for those who want absolute control over how their Tomcat instance is configured. With the capability of being able to configure tomcat in this fashion, opens the doors for tools/utilities to be written to programmatically create instances just how you like them.
  • The new Cross Site Request Forgery(CSRF) protection filter
    • This filter basically generates a nonce value after every request, and stores the value in the user’s session. The nonce has to be added as a request parameter on every request, and Tomcat will verify if the values are the same, to check to see if the request wasn’t from somewhere else.
  • Various default configurations
    • Access Logs on by default
    • LockoutRealm used by default
    • DefaultServlet serves content from the root of the context by default

I was glad to hear that SpringSource tc Server and the Tomcat 7 source were being kept in line , and felt at ease when I was reassured that whatever changes are being made in TC7 are soon finding their way into SpringSource tc Server.

Spring 3.1 MVC Update

I’m noticing more and more of a focus these days on Java based configuration with Spring, and this was highlighted in the Spring MVC session. Rossen Stoyanchev did a good job highlighting this point, and gave some good examples which demonstrated this. I’m still not 100% converted though, and I still feel that there is a place for xml configuration, but if I’m honest, I am beginning to find myself coding my configuration more these days.

There is much better support now for making customisations to any one or more aspects of the mcv namespace. whereas before if you were happy with the default configuration setup, all you previously had to do to setup most of the web bits was to have the following line in your xml config:

<mcv:annotation-config/>

However, if you wanted to setup an xml marshaller for example, then you pretty much had to redefine all the parts that the previous convinience xml fragment did for you. This was very much a pain, and now is easy to accomplish.  All that is required is that you annotate your configuration class with @EnableWebMvc(yes, you have to use the java based configuration route if you want to avert the previous pain) and extend the WebMvcConfigurerAdapter class. The WebMvcConfigurerAdapter class provides you with many callback methods to add to/modify what is configured by default.

Along with easier MVC configuration, there is also now a bit more transparency about what gets configured for you under the hood. If you take a look now at theWebMvcConfiguration class, you can now see what’s being configured for you now by default.

Other areas which were mentioned, but I am yet to explore, are features around pre/post validation hooks, as well as pre/post bind when binding your form object to a controller method invocation.

Spring Data Project

Now this is something quite exciting, and rather new to me. I like the idea Spring has here to build a data-access framework to give developers the capability to have their business object data stored in different data stores. The clever people over a SpringSource have built it in such a way that you can even have different parts of your domain object for example, stored in different data stores, so you might have some info stored in a graph database, some info in a regular RDBMS store, and if you have data that has no relation to anything, but you still need to store it, you can have that stored in a NoSQL data store, and all this, will be transparent to the user. Brilliant! If you have a application that stores data(who doesn’t?!), then I’d strongly suggest that Spring Data be given a once over. I for one think its a move forward in the right direction, empowered to store your data where it needs to be stored best, without having to worry about the vast amount of plumbing involved to get it done!

Maven android plugin, “–core-library” option not quite working

I’ve recently been working on building some android based applications now for the passed 3 or so months, and its been a fantastic journey so far. However, there have been times where I’ve found I talk to myself quite a bit, and for most part, I find myself muttering “what the heck is that supposed to mean?!”

This was one such occasion. I use maven for building my android project, but I had recently started using Springs RestTemplate, and there were a few libraries that I had to import while attempting to build REST based communications.

One thing that caught me off-guard, was, that when I came to build the project, I was now presented with a number of errors, all with the same sort of warning which read as:

[INFO] [android:dex {execution: default-dex}]
[INFO] C:\Program Files\Java\jdk1.6.0_20\jre\bin\java [-jar, C:\Program Files (x86)\Android\android-sdk-windows\platform-tools\lib\dx.jar, –dex, –output=C:\dev\android-sample\target\classes.dex, C:\dev\android-sample\target\android-classes]
[INFO]
[INFO] trouble processing “javax/xml/bind/annotation/adapters/CollapsedStringAdapter.class”:
[INFO]
[INFO] Ill-advised or mistaken usage of a core class (java.* or javax.*)
[INFO] when not building a core library.
[INFO]
[INFO] This is often due to inadvertently including a core library file
[INFO] in your application’s project, when using an IDE (such as
[INFO] Eclipse). If you are sure you’re not intentionally defining a
[INFO] core class, then this is the most likely explanation of what’s
[INFO] going on.
[INFO]
[INFO] However, you might actually be trying to define a class in a core
[INFO] namespace, the source of which you may have taken, for example,
[INFO] from a non-Android virtual machine project. This will most
[INFO] assuredly not work. At a minimum, it jeopardizes the
[INFO] compatibility of your app with future versions of the platform.
[INFO] It is also often of questionable legality.
[INFO]
[INFO] If you really intend to build a core library — which is only
[INFO] appropriate as part of creating a full virtual machine
[INFO] distribution, as opposed to compiling an application — then use
[INFO] the “–core-library” option to suppress this error message.
[INFO]
[INFO] If you go ahead and use “–core-library” but are in fact
[INFO] building an application, then be forewarned that your application
[INFO] will still fail to build or run, at some point. Please be
[INFO] prepared for angry customers who find, for example, that your
[INFO] application ceases to function once they upgrade their operating
[INFO] system. You will be to blame for this problem.
[INFO]
[INFO] If you are legitimately using some code that happens to be in a
[INFO] core package, then the easiest safe alternative you have is to
[INFO] repackage that code. That is, move the classes in question into
[INFO] your own package namespace. This means that they will never be in
[INFO] conflict with core system classes. JarJar is a tool that may help
[INFO] you in this endeavor. If you find that you cannot do this, then
[INFO] that is an indication that the path you are on will ultimately
[INFO] lead to pain, suffering, grief, and lamentation.
[INFO]
[INFO] 1 error; aborting
[INFO] ————————————————————————
[ERROR] BUILD ERROR
[INFO] ————————————————————————
[INFO]

Now that’s a pretty scary error to have, and on subsequent investigation, it seems like some marshalling libraries I’ve imported have the same namespace as some included java namespaces. Not to worry, I trust that the developers of this marshalling library know what they’re doing, so I just want it to build. But alas, following the instructions to use the –core-library option, the maven-android-plugin still refuses to build, and you just get back the same build error message.

I then found this nice bug report, which detailed pretty much everything I was experiencing – thank you to whoever you might be! So I thought the least I could do was fix the bug, if it was so well logged!

It turns out that the maven-android-plugin had a small bug in it, where the order of the options weren’t quite 100%. The GitHub pull request is here, and it has been accepted, so I assume it will be available in the next release.

I hope this helps anyone else out there experiencing this problem.